Data Migration – Oracle to Snowflake using Azure Blob Storage

Introduction

Are you trying to migrate Oracle to Snowflake? Have you looked all over the internet to find a solution for it? If yes, then you are in the right place. Snowflake is a fully managed Data Warehouse, whereas Oracle is a modern Database Management System.

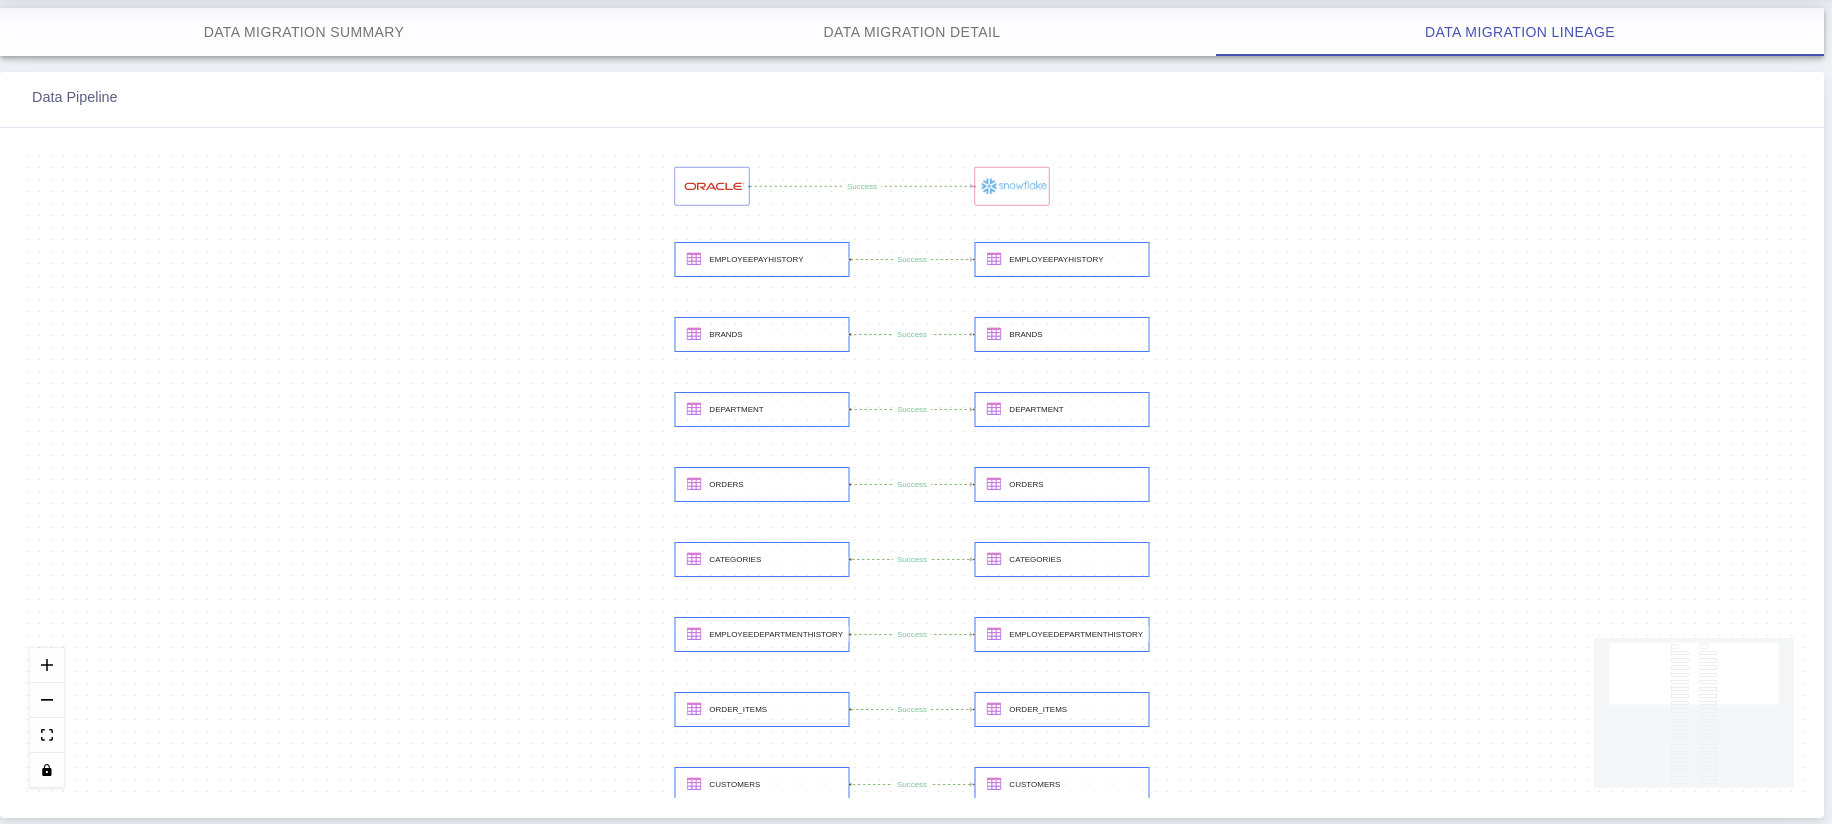
This article will give you a brief overview of migrating data from Oracle Database and Snowflake via Azure Blob stage.

What is Azure Blob stage, why do we need here:

Azure Blob – The staging area for Snowflake. This might be something created solely for use by Snowflake, but it is often already an integral part of a company’s greater data repository landscape.

Prerequisite
We need following active accounts for Oracle to Snowflake migration

  • Oracle Database
  • Snowflake
  • Azure Blob Storage Account

To know more about Oracle Database, visit this link.

To know more about Snowflake, visit this link.

To know more about Azure Blob, visit this link

Create Connections
1. Oracle connection
uArrow has an in-built Oracle Integration that connects to your oracle database within few seconds.

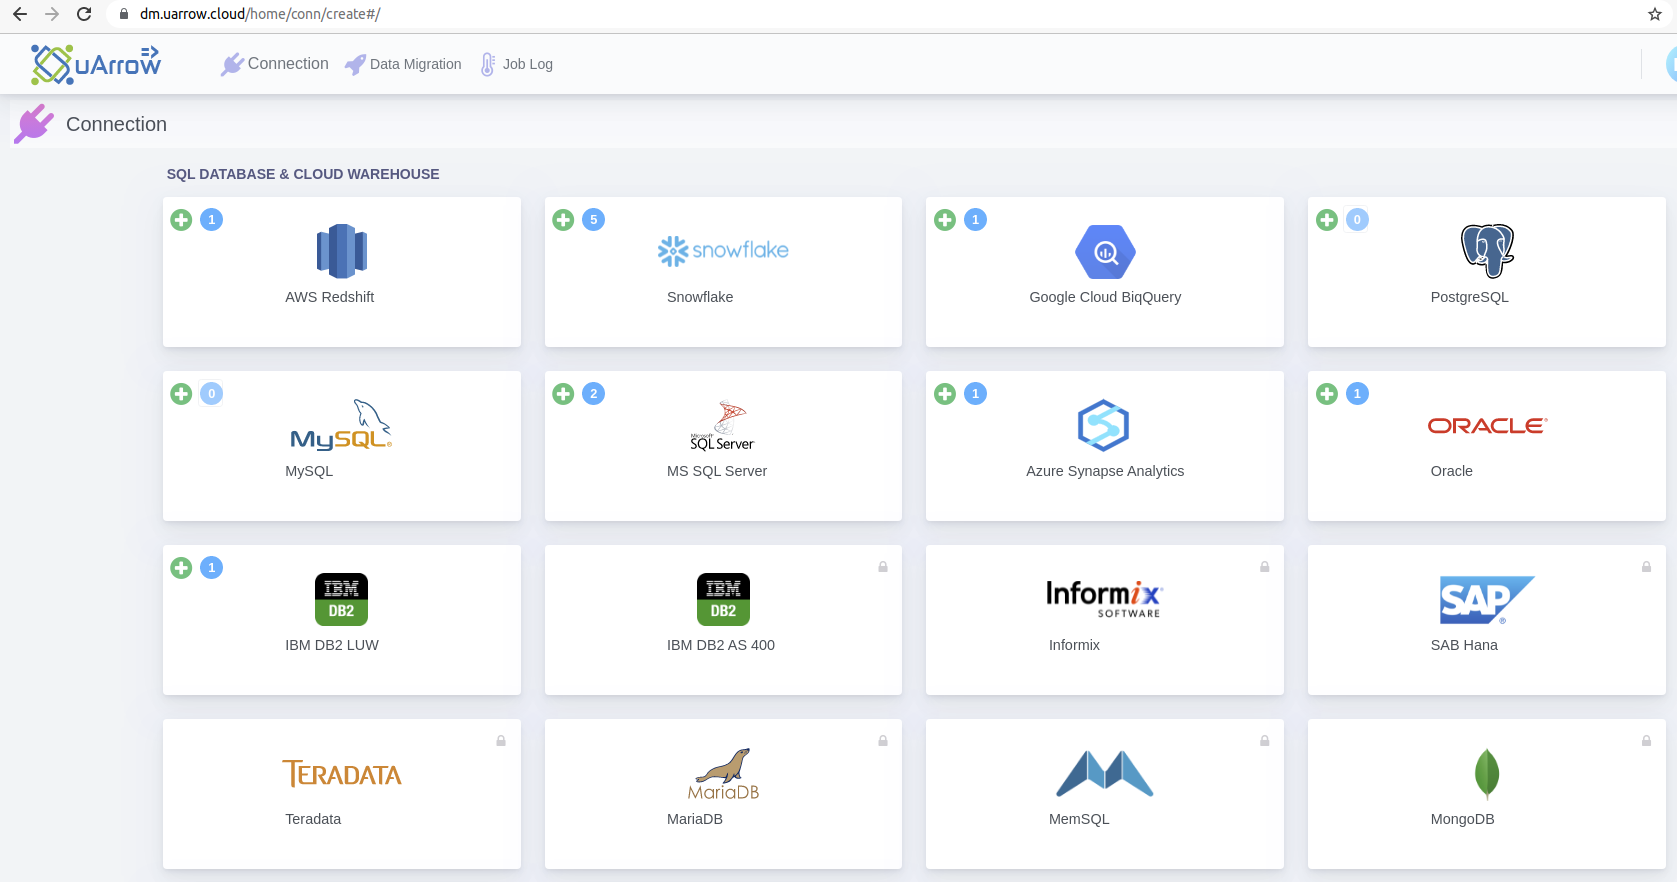
1.1. Click Connection menu from top to view (SQL DATABASE & CLOUD WAREHOUSE, CLOUD STORAGE, etc.) adapters

1.2. Click Oracle button to create Oracle database connection

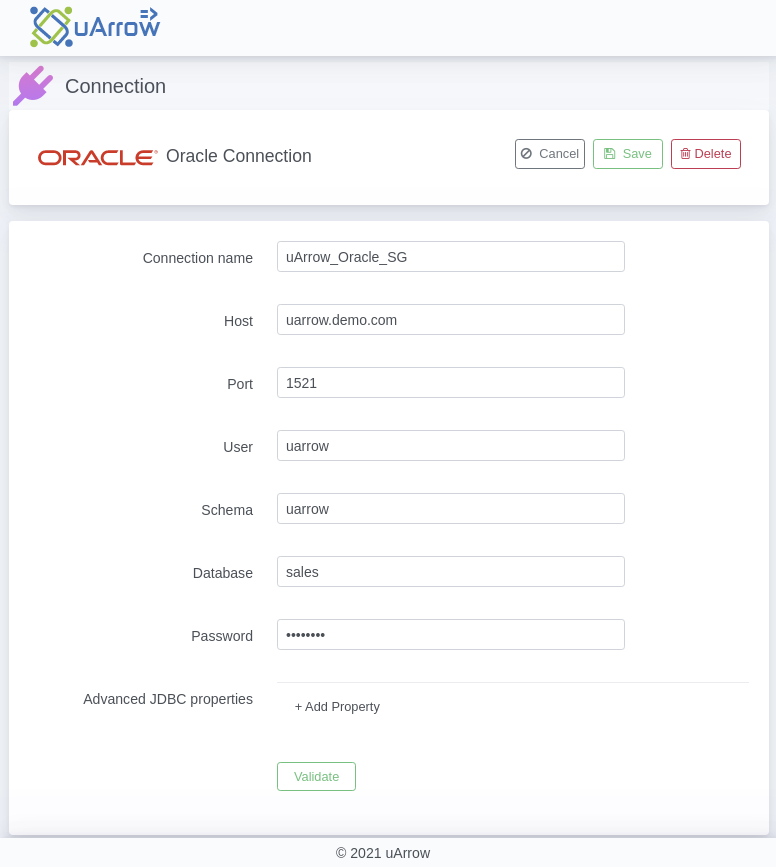
1.3. Provide below connection parameters in the connection creation form

Parameter Name Description
Connection name Specify the name of the source connection.
Host Enter the name of machine where the Oracle Server instance is located, it should be Computer name, fully qualified domain name, or IP address
Port Enter the port number to connect to this Oracle Server. Four digit integer, Default: 1521
Database Enter an existing Oracle connection through which the uArrow accesses sources data to migrate.
Schema Enter an existing Oracle database schema name.
User Enter the user name of the oracle database, The user name to use for authentication on the Oracle database
Password Enter the user’s password. The password to use for authentication on the Oracle database

1.4. After connection details, validate connection to verify
![Docusaurus](/img/uarrow/conn/dm_conn_oracle_create_2.png)
1.5. Save Connection – Don’t forget to save connection after connection validation success.

2. Azure Blob storage connection

uArrow has an in-built Azure Blob Integration that connects to your Azure Blob within few seconds.

2.1. Click Connection menu from top to view (SQL DATABASE & CLOUD WAREHOUSE, CLOUD STORAGE, etc.) adapters

2.2. Click Azure Blob Storage button to create Oracle database connection

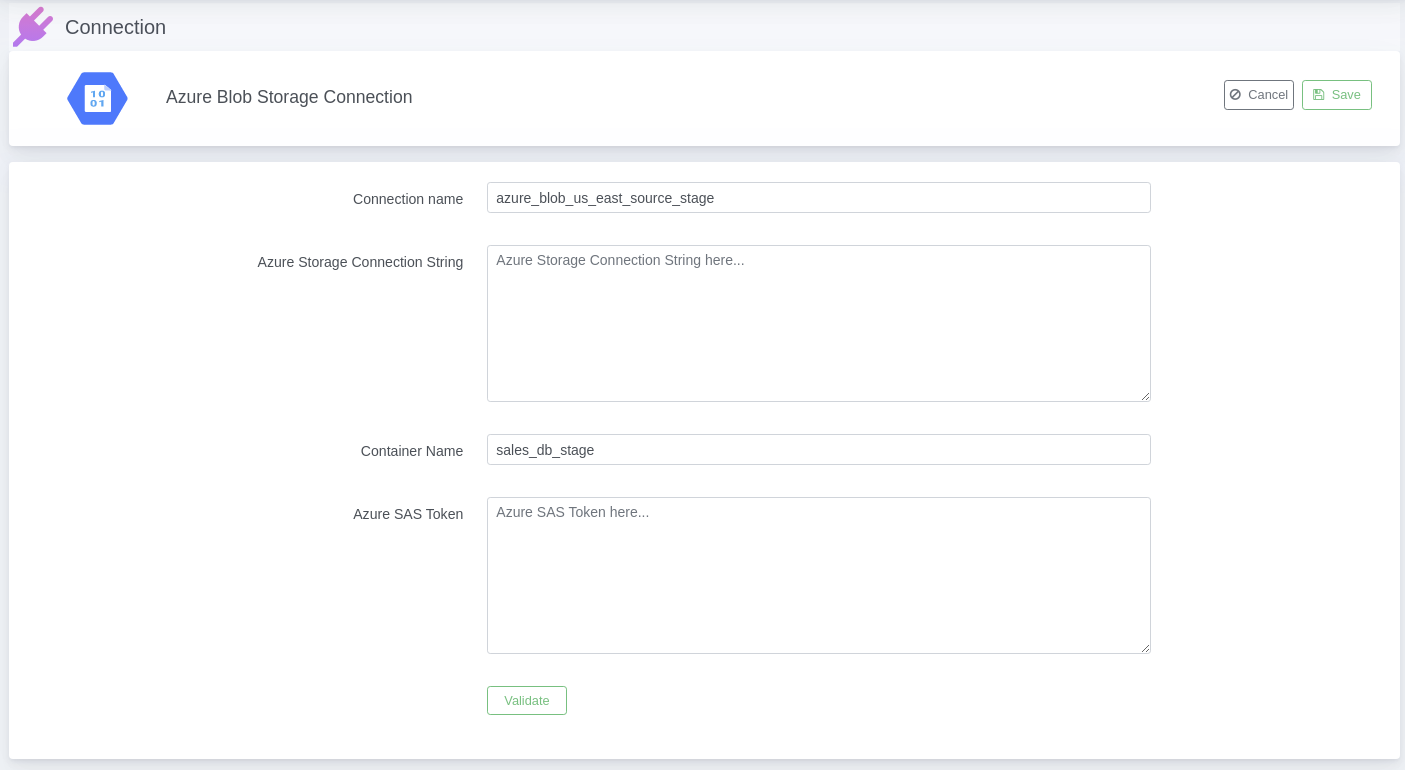
2.3. Provide below connection parameters in the connection creation form

Parameter Name Description
Connection name Specify the name of the stage connection.
Container Name Specify your existing azure blob container name.
Azure Storage Connection String Specify the azure storage connection string for your Amazon Web Services account.
Refer link
Azure SAS Token Specify the azure SAS token for your azure blob container.
Refer here to generate SAS token for azure blob container

2.4. After connection details, validate connection to verify
![Docusaurus](/img/uarrow/conn/dm_conn_oracle_create_2.png)

2.5. Save Connection – Don’t forget to save connection after connection validation success.

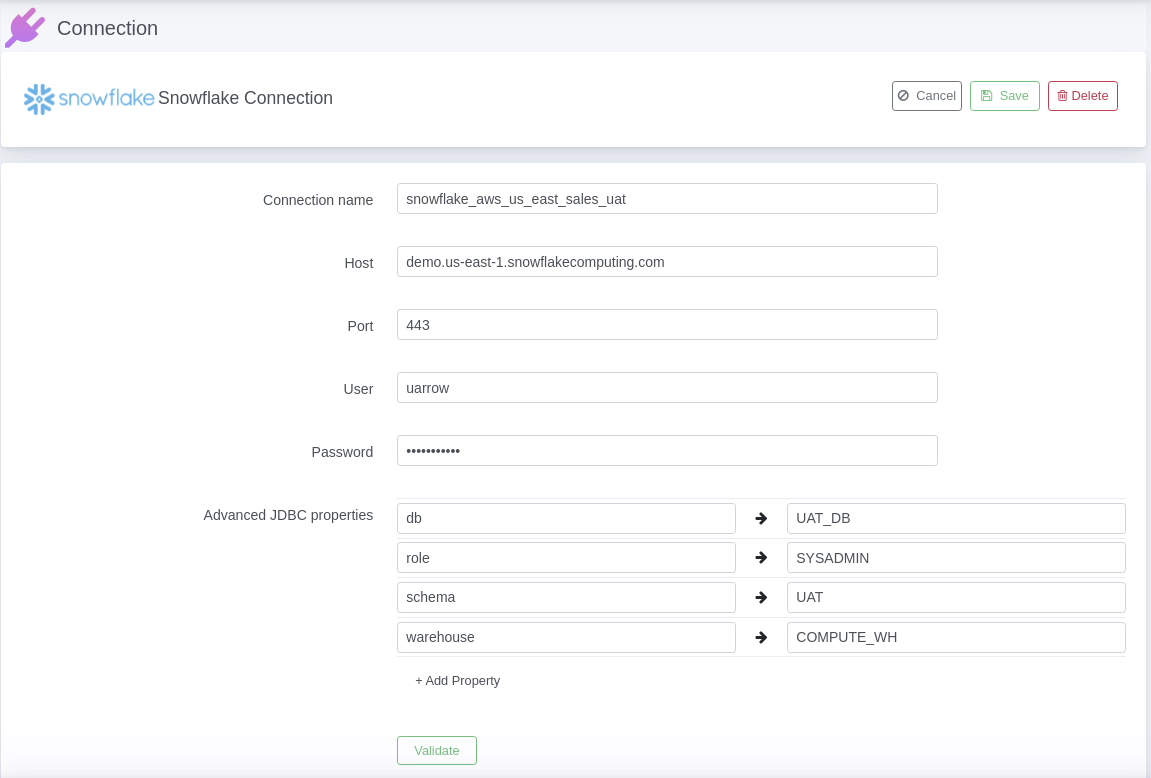
3. Snowflake connection#
uArrow has an in-built Oracle Integration that connects to your oracle database within few seconds.

3.1. Click Connection menu from top to view (SQL DATABASE & CLOUD WAREHOUSE, CLOUD STORAGE, etc.) adapters

3.2. Click Snowflake button to create Snowflake warehouse connection

3.3. Provide below connection parameters in the connection creation form

Parameter Name Description
Connection name Specify the name of the target connection.
Host Specifies the hostname / IP address of the snowflake warehouse.
Port Specifies the port number of the snowflake warehouse, default port 443
User Snowflake warehouse login name of the user for the connection.
Password Specifies the password for the specified user
db The specified database should be an existing database for which the specified default role has privileges.
schema The specified schema should be an existing schema for which the specified default role has privileges
warehouse The specified warehouse should be an existing warehouse for which the specified default role has privileges.
role The specified role should be an existing role that has already been assigned to the specified user for the driver. If the specified role has not already been assigned to the user, the role is not used when the session is initiated by the driver

3.4. After connection details, validate connection to verify
![Docusaurus](/img/uarrow/conn/dm_conn_oracle_create_2.png)
3.5. Save Connection – Don’t forget to save connection after connection validation success.

Create Job
After creating connections, you are ready to create data migration job.

Click Data Migration menu from top to create data migration job.

You can able to see below screen, there you can click again create link to create new job.

Note: if you are already created any job you can use + button to create new data migration job.

Job Creation screen has three phases

Source – specify source database details
Mapping – Verify automated mapping
Target – specify target warehouse details

1. Source
Define source details

Specify below details to define source
| Parameter Name | Description
|
| ------------------------------- | ------------------------------------------------------------ |
| Name | Specify the new name for data migration job. |
| Description | Specify detail description if required. |
| Mapping Creation | Mapping can be created in two ways
1. Using System - You can use uArrow screen to select / de-select the mapping details
or
2. Using Existing File - If you have prepared mapping's in csv file, you can import here
In this article we are using Option 1. Using System
|
| Source Connection | Select source database connection which you have already created, if not find any source connection then create connection. |
| Source Stage Connection | This is stage connection, stage connection can be AWS S3, Azure BLOB Storage or Google Cloud Storage which you have created already in above steps
In this article we are using **Azure Blob** as Source Stage
Note: Based on your target connection location you can decide **Source Stage**.
Example: Snowflake warehouse sits in AWS, then use AWS S3 as **Source Stage**
or my Snowflake warehouse sits in Azure platform then recommeded to use Azure BLOB storage |
| Choose Source Stage File's Path | Select your existing Azure Blob container folder or create new folder path |
After specifying source details, **Save** the connection and click **Next** for mapping defining screen
![Docusaurus](/img/uarrow/job/dm_create_job_o_snow_ab_1.png)

After specifying source details, Save the connection and click Next for mapping defining screen

2. Mapping
uArrow generates automated mapping based on source schema metadata.

Below are the features being available to enhance your mapping for data migration

Feature Name Description
Required To exclude relatable table /data sets you can de-select the required flag.
Create Table This feature helps to create new table in target warehouse, if de-selected then existing target table re-used to migrate
Clean Load Enabled: To delete/truncate the target table data and load source table data, this flag disabled if Create Table option enabled
Disabled: No delete/truncate performed, just inserted the target table data from source table data
Capture Bad Rows This feature helps to capture bad rows (failed rows) in seperate bad rows table for future analysis
Follow Target Schema This feature enabled then source table data loading based on target table data type / schema, this option disabled if Create Table option enabled.
Source Filter This feature helps to filter out data using ANSII SQL from source table / data set

After verifying mapping definitions, please click Apply button to save mapping changes and click Next buttong to define Target definitions

3. Target
Define target details

Parameter Name Description
Target Stage Connection Select existing defined target connection, Here we need create, truncate/delete, insert, select table permission, this connection mainly captures bad rows and act as stage area for target connection
No. Target Load Default Value : 1, You can increase if you want load to multiple targets from same source.
Target Connection 1 Select existing defined target connection to migrate source data. Here you need minimum insert, delete, select permission if Create Table feature enabled, else create, insert, delete, select permission required.

After defining target connection details, click Save button to save data migration job

4. Schedule / Ad-hoc Run
After saving the data migration job, you can run job (ad-hoc run) or you can schedule job if required.

Adhoc Run: You can use Run icon/button to run adhoc run, after run it will take you to job log dashboard screen.

Schedule: You can use Schedule icon/button to schedule existing job.

Monitoring Job

​ Congratulations! You have created new job for oracle to snowflake, and run successfully, here you can see job summary stats, detail, and lineage as below.

1. Navigate to Job Log
Click Job Log menu from top to check job logs.

2. Summary Stats
Click on existing Job Status link/button in above screen to view job log dashboard, this will take you to Data Migration Job Log Summary screen

2. Detail Stats

Data Migration Table Level Status: Here you can see failed details rows clicking on Failed Rows count if any.

3. Lineage

Questions? Feedback?

Did this article help? If you have questions or feedback, feel free to contact us

Menu